If you wish to set up products using the WooCommerce plugin but you want the payment/transaction to be handled using the neat PayPal Express Checkout system, then follow this tutorial to set up the WP Express Checkout PayPal gateway integration successfully.
When this integration is used, it works just like a payment gateway extension with WooCommece. The PayPal checkout option will show up as another payment gateway in your WooCommerce setup. Your website will retain all the functionalities of WooCommerce, with the only exception being the payment processing during the Checkout Process. This aspect will be handled by the WP Express Checkout plugin, while the rest of the process will continue to be managed by WooCommerce.
Being able to integrate the WP Express Checkout Plugin with the WooCommerce Plugin gives business owners the option to offer a secure and simple checkout experience to their customers. The way the WP Express Checkout Plugin handles the PayPal payment within a popup window means that the customers never leaves your website. In turn, cart abandonment is drastically reduced.
How Does the WooCommerce Integration Work?

The following video shows how the PayPal Express Checkout Transaction process works with WooCommerce.
If you are already using WooCommerce, or you plan to set up the product you have for sale using the WooCommerce platform, the good news is you can still allow the WP Express Checkout Plugin to handle your customer’s payments via the PayPal payment platform. WooCommerce will handle the product side of things, and the WP Express Checkout Plugin will offer the PayPal Express Checkout payment gateway option.
Read through the following considerations before moving on with the WP Express Checkout Plugin WooCommerce Integration:
- The product will be created with the WooCommerce plugin.
- Payments are transacted with the PayPal Payment Gateway handled by the WP Express Checkout Plugin.
- Your customer’s details such as their address (shipping information) will be stored in the WooCommerce ‘Orders’ menu as usual.
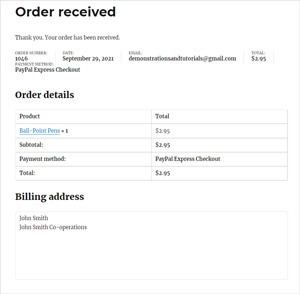
- The ‘Order Received/Thank You Page’ the customer is directed to after a successful payment is handled by the WooCommerce plugin.
While the WooCommerce plugin is a robust and heavyweight plugin, if you are looking for a light-weight and simpler ‘Buy Now’ style checkout option, you may be able to set up your products and payment buttons using entirely the WP Express Checkout Plugin. Integrating the ‘WP Express Checkout Plugin’ with WooCommerce is suitable for those users who use WooCommerce primarily and want to allow the PayPal Express Checkout gateway as an option for their customers to pay with.
Do I Need the WP Express Checkout WooCommerce Integration?
When to Use the WP Express Checkout + WooCommerce
You primarily use the WooCommerce plugin as your main e-commerce solution. You create products within the WooCommerce Plugin and wish to offer the PayPal Express Checkout payment option to your customers.
When to Use ONLY the WP Express Checkout Plugin
You don’t want to use the WooCommerce plugin. You want a light-weight solution to sell some products and services from your site. You will setup products within the Express Checkout plugin and are happy to process all payments through the PayPal Express Checkout Popup Window.
Why Should I Add PayPal Express Checkout to My WooCommerce Payment Methods?
You may be wondering whether or not you should add the PayPal Express Checkout payment option to your list of other options that a customer can choose to complete their transaction. The Popup that the PayPal Express Checkout offers has more than just one way of paying. When you add this option to your checkout, you open up a number of different ways that your customers can pay. Your customers will be able to use their ‘Debit or Credit Card’ and their ‘PayPal Balance’. They will also be able to use the Buy Now Pay Later option using PayPal’s Pay in 4 feature.
Not only does adding the PayPal Express Checkout as an option mean there is a suitable method of payment for a variety of customers around the world, but PayPal is also a well-trusted payment gateway. The way that the WP Express Checkout plugin allows for the checkout to be handled in one neat PayPal popup window makes sure that the customer never has the need to leave the website to complete the transaction.
Video Tutorial: Setting Up the WP Express Checkout WooCommerce Integration
Written Tutorial: Setting Up the WP Express Checkout WooCommerce Integration
Before you are able to complete the integration, ensure you have completed the basic setup of both the WP Express Checkout Plugin and the WooCommerce Plugin. Both these plugins are free and available to be downloaded directly from your WordPress dashboard.
Step 1) Installing, Activating and Completing the Required Basic Settings
- Make sure that you have the free WP Express Checkout Plugin and the free WooCommerce Plugin installed and activated on your WordPress website.
- You will need to complete the basic set up for each of these plugins. Click here for more information on setting up the WP Express Checkout Plugin. Read more about setting up the WooCommerce Plugin here.
Once you have completed the basic setup for each of these plugins (including entering your PayPal credentials into the WP Express Checkout ‘General Settings’ fields), you are ready to move on to the next step.
Before you move on, we recommend creating a basic product using only the WP Express Checkout plugin (this is for testing purpose). Then complete a test transaction with this newly created product. This will allow you to make sure that the payment process is working correctly prior to integrating with WooCommerce.
Step 2) Integrating the WP Express Checkout Plugin with the WooCommerce Plugin
Now that you have both plugins ready to go on your WordPress website, complete the following steps to integrate these plugins:

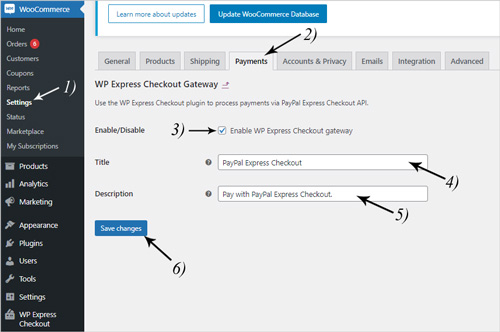
- Click on the ‘WooCommerce‘ menu and then on ‘Settings‘.
- Choose the ‘Payments‘ tab from the ‘Settings‘ menu.
- You will see the ‘WP Express Checkout Gateway‘ as a payment method. To integrate this payment option so that your customers can checkout in the PayPal Popup window, enable this payment option by clicking the toggle button.
- Click on the ‘Manage‘ button for the ‘WP Express Checkout Gateway‘ option.
- You can customize the ‘Title‘. This will be what the customer sees for this payment option. Make it clear and concise and let them know exactly what this payment option is. For example, you may like to add ‘PayPal Express Checkout‘ or similar in this field.
- You can alter the description of this payment option if you wish to. Make sure you let the customer know exactly what they should expect when they choose this payment option.
- Hit the ‘Save Changes‘ button. The ‘WP Express Checkout‘ payment option will now appear as a choice for your customers to checkout with when they attempt to purchase a product you have created using the WooCommerce plugin.
Step 3) Creating a WooCommerce Product
When you integrate these two plugins, the payment is handled by the ‘WP Express Checkout‘ Plugin while the product creation, inventory, emails, and order details are all handled by ‘WooCommerce‘. You will create the product with WooCommerce, and only at the checkout point does the WP Express Checkout make an appearance.
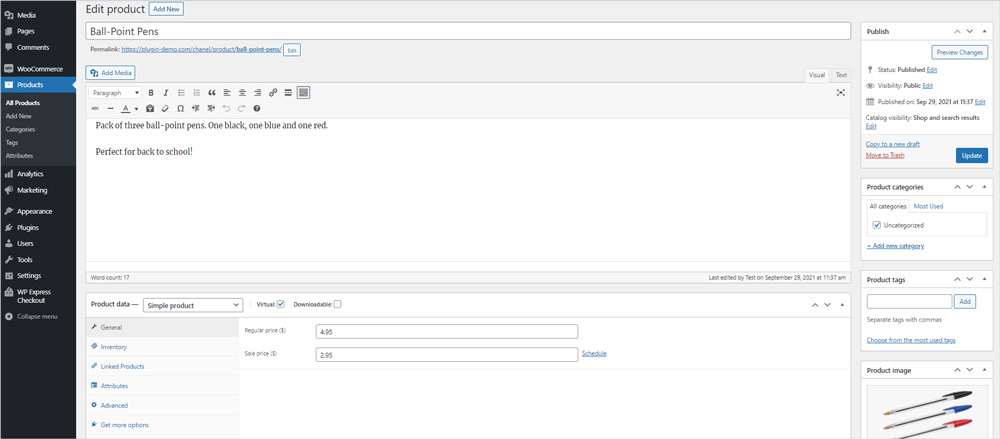
- In your WordPress dashboard, click on the ‘Products‘ menu.
- You will see the option to ‘Add New‘. Once you click on this button, it will take you to the product creation page. Then fill in the fields to create the product.
- Give your product a title, description, price, and thumbnail image. You can read more about creating an WooCommerce product here.
- Once you have completed the fields for your product, click the ‘Publish‘ button.
- You will now be able to view your product on the front end of your website.
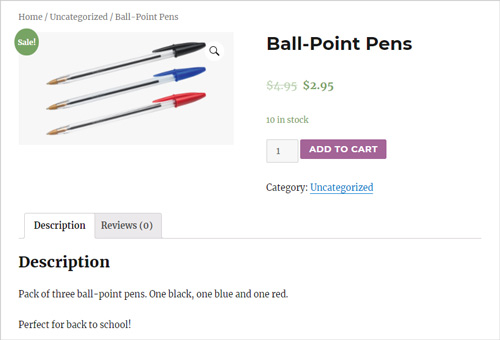
Step 4) Completing a Transaction with a WooCommerce Product and Paying with PayPal Express Checkout
Now that you have created your product and integrated the WP Express Checkout Plugin with the WooCommerce Plugin, you will be able to complete a test transaction to see how the checkout process will work out for your potential customers.
- View your product from the front end of your website.
- Click the ‘Add to Cart‘ button for your product and then ‘View Cart‘.
- Once you are on the ‘Cart‘ page, you will see your product within the cart and then a button to ‘Proceed to Checkout‘. Click on that button to proceed.
- At this stage you will be asked to enter your billing details (address). Complete your billing/shipping details and then towards the bottom of this page you will see payment options that you can choose between.
- The payment options you are shown depend on what you have set up. Choose the ‘PayPal Express Checkout‘ option to complete a transaction handled by WP Express Checkout Plugin using the PayPal Payment Gateway. Click the ‘Place Order‘ button.
- The popup window will appear where you can choose to ‘Pay with PayPal‘ or a ‘Debit or Credit Card‘.
- Complete the PayPal checkout in the popup window.
- Once you complete the transaction you will be directed back to the WooCommerce ‘Order Received‘ page.
- Admin can view customer orders by clicking on the ‘Orders‘ menu beneath ‘WooCommerce‘. This is where they can find the customer’s address to ship out physical items.
Visual Steps: Purchasing a WooCommerce Product and Selecting to Pay with PayPal Express Checkout
Step 1) The customer sees a product they wish to purchase and adds it to their cart. They then click the button to view their cart.
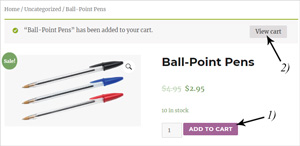
Step 2) The customer is happy with the items in their cart and proceeds to the checkout.
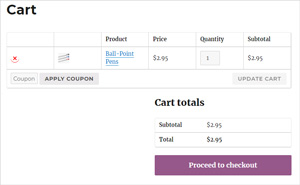
Step 3) Once the billing details are entered by the customer they scroll to the bottom and choose to pay with the ‘PayPal Express Checkout’. They Click the ‘Place Order’ button to proceed.
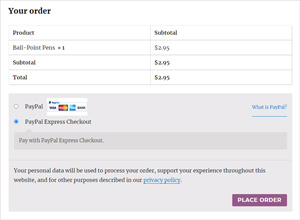
Step 4) The WP Express Checkout popup window appears where the customer has the option to ‘Pay with PayPal’ or with their ‘Debit or Credit Card’. In this case, the customer chooses to pay with their PayPal account.
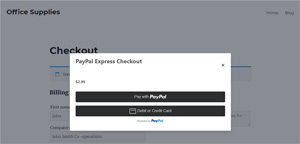
Step 5) The customer enters their PayPal login details and chooses to use their balance to pay.
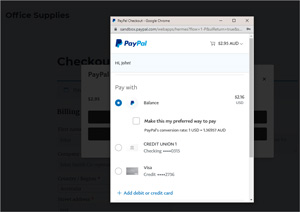
Step 6) The customer is directed back to the WooCommerce ‘Order Received’ page and their transaction is recorded within the WooCommerce ‘Orders’ menu.
