The WP Express Checkout Subscriptions Addon can be used alongside the WP Express Checkout Plugin to charge subscriptions or recurring payments.
This addon allows you to create subscription products whereby the customer is billed on a recurring basis that you set up, for example, charge $50.00 per month for one year.
If you wish to charge your customers on a recurring basis, through the PayPal Payment Gateway, the WP Express Checkout Subscriptions Addon is an easy and simple solution for your WordPress website.
Table of Contents
- Video Guide – Installation and Setup of the Addon
- Installing and Setting Up the Subscriptions Addon
- Creating Your First Subscription Style Product
- Customer Checkout with a Subscription Product
- Viewing and Cancelling a Customer’s Subscription on Your Website
- Grab the WP Express Checkout Subscriptions Addon
Video Guide – Installation and Setup of the Addon
Installing and Setting Up the Subscriptions Addon
Step 1) Installing and Activating the Addon
Once you have purchased this addon, complete the following to install and activate it on your WordPress website:
- Click on the Add New menu under the plugins interface.
- Click on the Upload Plugin button and select the addon zip file.
- Hit the Install Now button and then activate the addon.
- Ensure you have the latest version of the ‘WP Express Checkout Plugin‘ and the ‘WP Express Checkout Subscriptions Addon‘ installed and activated before continuing.

Step 2) Settings Configuration for the Subscriptions Addon
Completing the setup for the WP Express Checkout Subscriptions addon is simple, taking into account that you have already completed the General Settings Configuration for the main WP Express Checkout Plugin.
To complete the set up required for the Subscriptions Addon complete the following:
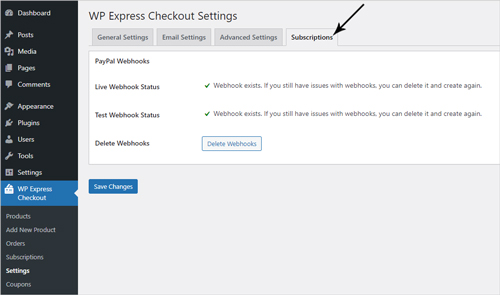
Step 1) Click on the ‘Settings‘ menu found beneath ‘WP Express Checkout‘.
Step 2) Choose the ‘Subscriptions‘ tab. You will see a ‘PayPal Webhooks‘ section.
Step 3) Simply click the ‘Create Webhooks‘ button next to the ‘Live Webhook Status‘ and ‘Test Webhook Status‘.
Step 4) Click the ‘Save Changes‘ button. You have now completed the simple setup required to use this addon.
Creating the webhooks allows the plugin to connect to your PayPal account so that subscription transactions (both test and live) can be processed.
Creating Your First Subscription Style Product
Once you have the Subscriptions Addon installed and you have completed the setup outlined in the section above, you are ready to create your first subscription-style product.
Step 1) Click the ‘Add New Product‘ menu found beneath ‘WP Express Checkout‘.
Step 2) From the product creation interface, add a ‘Title‘ and ‘Description‘ like you would for any basic product.
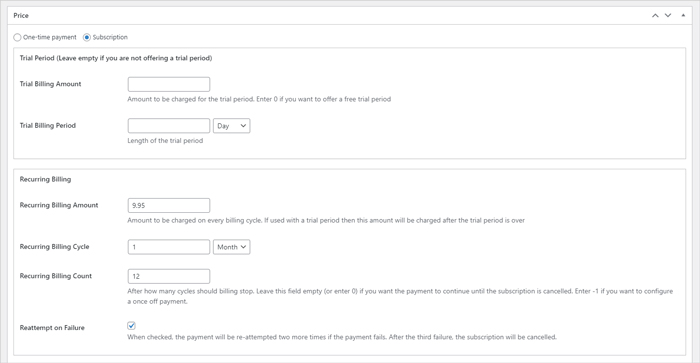
Step 3) Within the ‘Price‘ section, select the check circle next to ‘Subscription‘, this allows the plugin to know you wish to sell a subscription product and therefore will display subscription-related pricing fields. There are three sections within the ‘Subscription‘ price option.
Step 4) If you wish to add a ‘Trial Period‘, enter a ‘Trial Billing Amount‘ and select the ‘Trial Billing Period‘.
Step 5) In the ‘Recurring Billing‘ section is where you will determine how much the customer is charged, how regularly, and for how long. Add a ‘Recurring Billing Amount‘, set the ‘Recurring Billing Cycle‘ and within the ‘Recurring Billing Count‘ stipulate how many times the customer will be charged the amount. You can read more about configuring these below.
Step 6) Within the ‘Additional Settings‘ section of ‘Price‘, you might like to add a ‘Plan Description for Product Display‘. This allows you to add a description that will show in the payment popup window. It is an opportunity to better describe the amount the customer will be charged, how regularly and for how long.
Step 7) Add the ‘Quantity‘ of the product, add a ‘Download URL‘ for a digital products and add a ‘Product Thumbnail‘.
Step 8) Scroll to the top of the ‘Add New Product‘ page and click the ‘Publish‘ button. You have now created your first subscription product which you can display anywhere on your site by using the unique shortcode for your product. Read more about how to display your product on your WordPress website here.
Understanding Recurring Billing Fields
Recurring Billing Amount
This field requires a numeral that your customers will be charged on each of the billing cycles. If I wished to charge customers $39.95 per month for one year then I would enter ‘39.95’ into this field as the recurring billing amount. It is important that no currency symbols are entered in this field (you can alter the currency from the ‘General Settings’ menu of the WP Express Checkout Plugin).
Billing Cycle
You will need to specify a numeral which is the number of times and then the period from the drop-down menu to set the ‘Billing Cycle’ of your subscription. This is how often your customer will be charged. For example, if I wish to charge my customers once per month, then I would add ‘1’ to the ‘Recurring Billing Cycle’ field and then choose ‘Month’ from the drop-down menu. You can choose to charge your customers on a daily, weekly, monthly, or yearly basis.
Recurring Billing Count
This field is where you can enter the number of payments to be deducted before the subscription ends. In short, how many times the customer is billed. If you wish for the customer to be billed indefinately, then enter ‘0’ in this field. If you wish for the customer to only be billed once, than enter ‘1’ and so forth.
Altering Payment Button Text to Reflect Subscription Product
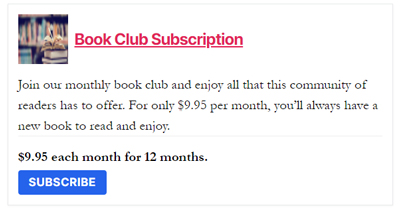
You may wish to alter the text of the purchase button to better reflect the subscription product. By default the button reads ‘Buy Now’, but you may wish for this to say ‘Subscribe’ or ‘Subscribe Now’. You can alter the button text from the ‘General Settings’ tab found by clicking on ‘Settings’ underneath ‘WP Express Checkout’.
Adding a Trial Period to Your Subscription Product
A trial period allows the customer to enjoy your subscription for a time period for free before the first payment is withdrawn from their account or alternatively at a reduced rate. This may entice the customer to sign up for your subscription if they know that they will be receiving a subscription item or service for free or cheaper for a set period of time. Using the WP Express Checkout, creating a trial period can be achieved by completing the following:
- In the ‘Price’ section on the product creation page, ensure you have chosen the ‘subscription’ option. You should now see the option to add a ‘Trial Period’.
- In the Trial Billing amount choose how much you would like to charge for the trial period. You may like to charge at a reduced rate for the trial period, or you may like to offer a free trial period in which case you will enter ‘0’ into this field.
- Within the ‘Trial Billing Period’ field set the period of the trial. For example ‘7’ and then ‘Days’ from the drop-down menu.

How Can I Display the Plan Description in the Checkout Window?
You can add a short description of your subscription plan to better inform your customers about what they are signing up for. When selling subscriptions it is best practice to be transparent about how much the customer will be charged, how regularly, and for how long. You can add the description from the ‘Plan Description for Product Display‘ field found under the ‘Price‘ section of the product interface. Keep your description short and concise so that it fits nicely into the popup window.
Customer Checkout with a Subscription Product
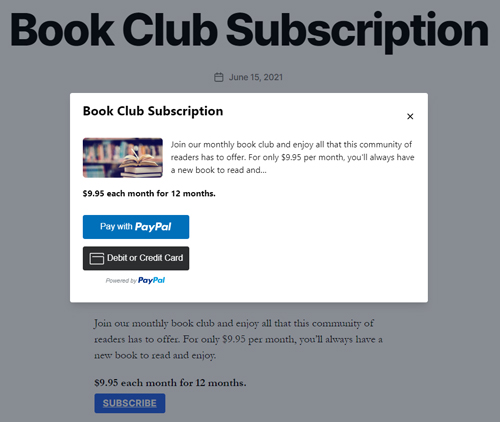
Once you create a subscription product using the WP Express Checkout Plugin and Subscription addon, you may be wondering how the checkout process for your customers will work. The checkout process is simple and with the transaction taking place entirely in a popup window, it ensures the customer never has the need to leave your website. As the payment is processed through the PayPal payment gateway, your customers will be able to rest assured that their sensitive details are in safe hands.
Your customers will:
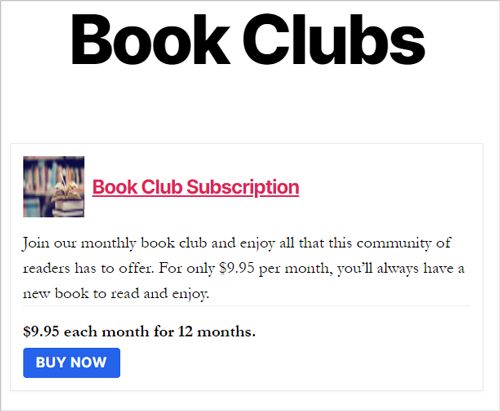
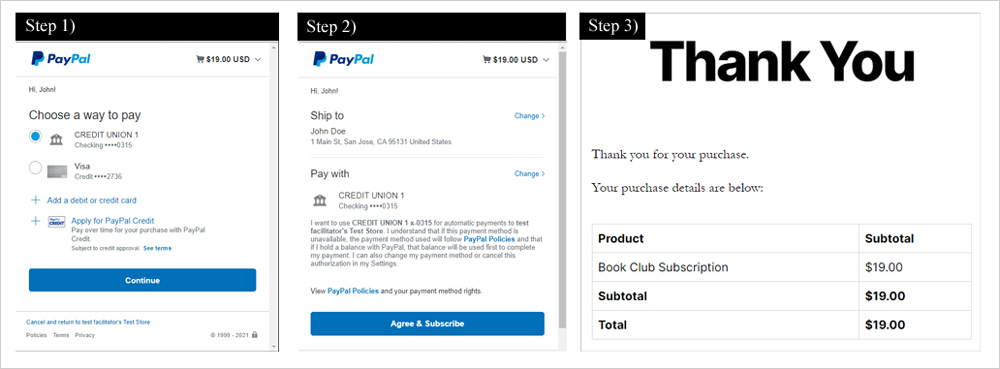
Step 1) Land on your website and click the ‘Buy Now‘ button associated with your subscription product. They will now see the PayPal popup window appear where they will need to enter their PayPal details or continue with their debit/credit card.
Step 2) If they have chosen to use their PayPal account they will need to ensure their address is correct before clicking the ‘Agree & Subscribe’ button.
Step 3) The customer will be directed to a Thank You page on your website after a successful transaction. As an admin you will be able to view their subscription from your WordPress dashboard (read more about viewing subscriptions below).
The customer will be billed automatically dependent on the amount, billing interval, and billing duration that you have set up for that subscription product.
Viewing and Cancelling a Customer’s Subscription on Your Website
Viewing a Customer’s Subscription
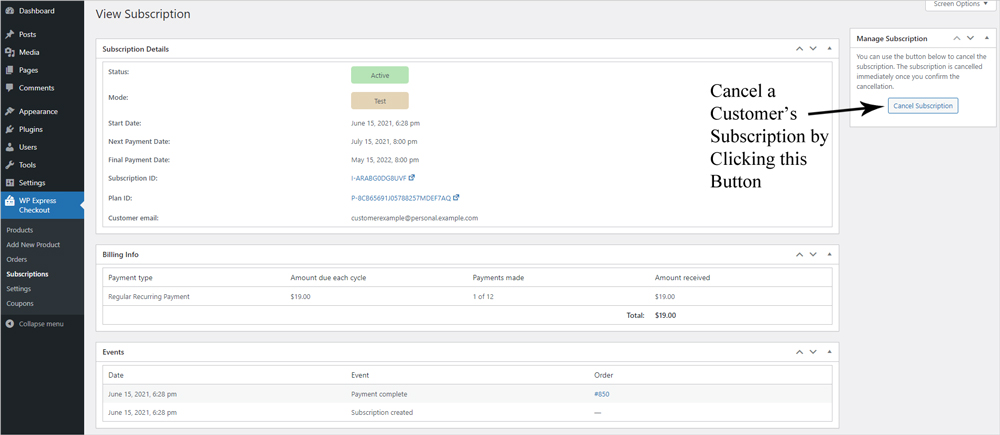
Once you have successfully sold a subscription to a customer, or you have completed a test transaction on your website, you will be able to see the details of the subscription within the ‘Subscriptions‘ menu found under ‘WP Express Checkout‘.
To view a specific subscription, simply click the ‘View Details‘ button. From here you will see the details about that subscription. Some of the details you can find on this ‘View Subscription‘ page include:
- The status of the subscription
- When the final payment should be deducted
- The customer’s email address
- The amount due per cycle
- How many payments have been made so far
- The total amount received from this customer

Cancelling a Customer’s Subscription
If for any reason you need to cancel a customer’s subscription, you can achieve this from the ‘WP Express Checkout’ ‘Subscriptions’ menu. Click on the subscription that you wish to cancel, then once you are on the ‘View Subscription‘ page, you will see a ‘Cancel Subscription‘ button. Cancelling a subscription will ensure no further payments are deducted from the customer in question. A subscription cannot be resumed once cancelled and the customer would need to sign back up to a new subscription on your website.
Grab the WP Express Checkout Subscriptions Addon
This is a one-time payment (includes 1 year of support and updates).
