Using the WP Express Checkout Custom Fields Addon alongside the WP Express Checkout Plugin allows administrators to collect information from customers before they checkout within the PayPal popup window. Different styles of custom fields can be created including drop-downs, text fields, checkboxes, and date pickers.
Note: Custom fields are different than the product variations that you can create for your products.
Custom fields are created and then can be selected on a per-product basis. This means that different fields can be created and applied individually to products. Custom fields can be marked as ‘Required’ meaning that the customer must supply an answer before being able to checkout.
The information entered into the custom fields can be viewed from the Orders menu of plugin’s admin dashboard.
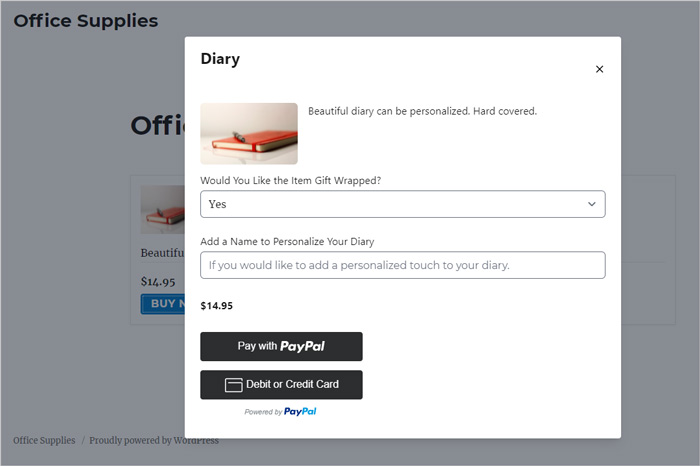
The picture above shows an example of how your customers will view and be able to answer the custom fields that you create.
Table of Contents
- WP Express Checkout Custom Fields Use Cases
- Install and Activate the Addon
- Step 1) Creating Custom Fields
- Step 2) Applying Custom Fields to a Product
- Viewing the Custom Field Data from the Order’s Menu
- Including Custom Fields in the Buyer’s or Seller’s Email
- Including Custom Field Data on the Thank You Page
- Get the Custom Fields Addon
WP Express Checkout Custom Fields Use Cases
The custom fields addon is extremely useful for administrators who need to ask a number of questions before a customer purchases a product. Perhaps the product has the ability to be personalized and the admin needs to know the text that the customer would like to include. Or maybe a simple question asking whether the customer needs the item gift-wrapped or not.
Questions that relate directly to the product might be added, or the questions could be general company feedback.
Using the four types of custom fields (dropdown, checkbox, text, and date picker), administrators can create questions for all the information they wish to ask their customers before they checkout with a product or service on their website.
Install and Activate the Addon
Once you obtain the WP Express Checkout Custom Fields Addon complete the following:
- Click on the Add New menu under the plugins interface.
- Click on the Upload Plugin button and select zip file for the addon.
- Hit the Install Now button and then activate the addon.
- Once you have activated the plugin, you will see a new tab titled Custom Fields within the WP Express Checkout plugin’s Settings menu.
If you have not yet purchased a copy of the addon, you can do from the bottom of this page. You will need the ‘WP Express Checkout Custom Fields Addon’ installed and activated on your WordPress website to complete this tutorial.
Step 1) Creating Custom Fields
You will need to create your custom fields first, and then you will be able to add them on a per-product basis.
To create your first custom field, complete the following:
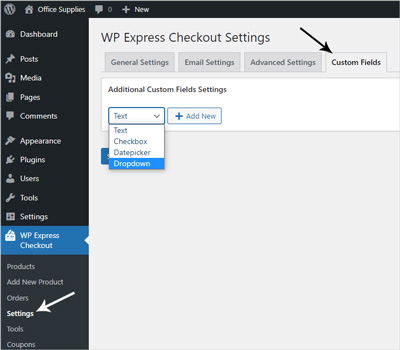
- Click on the ‘WP Express Checkout‘ menu and then on ‘Settings‘.
- From within the ‘Settings‘ menu, click on the ‘Custom Fields‘ tab.
- To add your first custom field, choose which type of field you would like to add from the drop-down menu and then click ‘Add New‘.
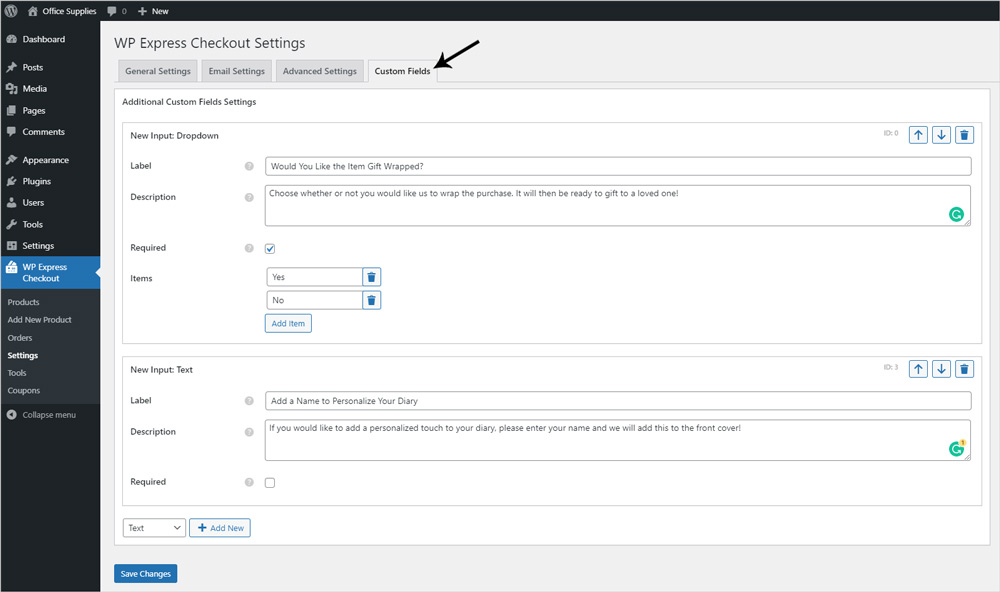
- The new input will appear. Depending on which type of custom field you use, you will notice different information can be entered to create it.
- Once you have entered the information for the custom field, you may like to add another custom field, or you can ‘Save Changes‘.
Types of Custom Fields Available:
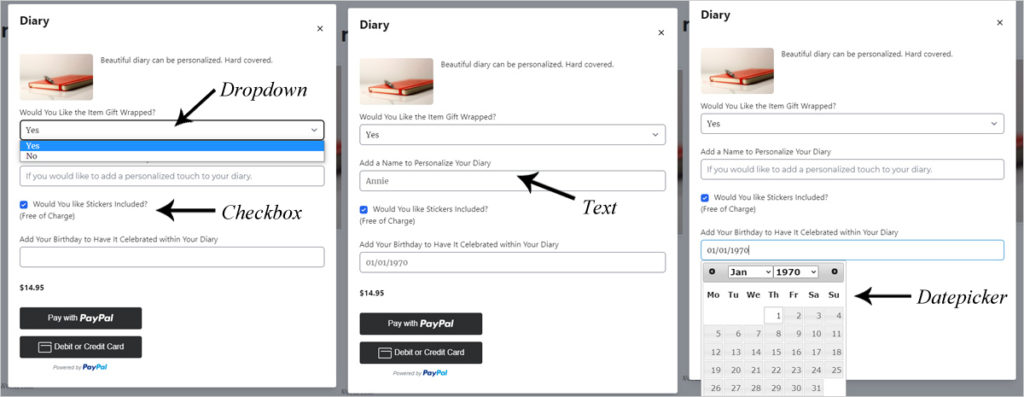
Drop-Down: A drop-down field allows you to ask a question and add multiple choices which will appear to the customer in a drop-down menu. The customer can select the answer that applies to them.
Text: A text custom field allows you to ask a question in which a customer can reply with words/numbers which they can enter into a text box.
Checkbox: A checkbox custom field allows the customer to check a box to opt-in or choose to leave the box unmarked to decline the offer. You can choose to have the checkbox marked by default.
Date-picker: A date-picker style custom field will allow the customer to select a date that answers the question that you are asking.
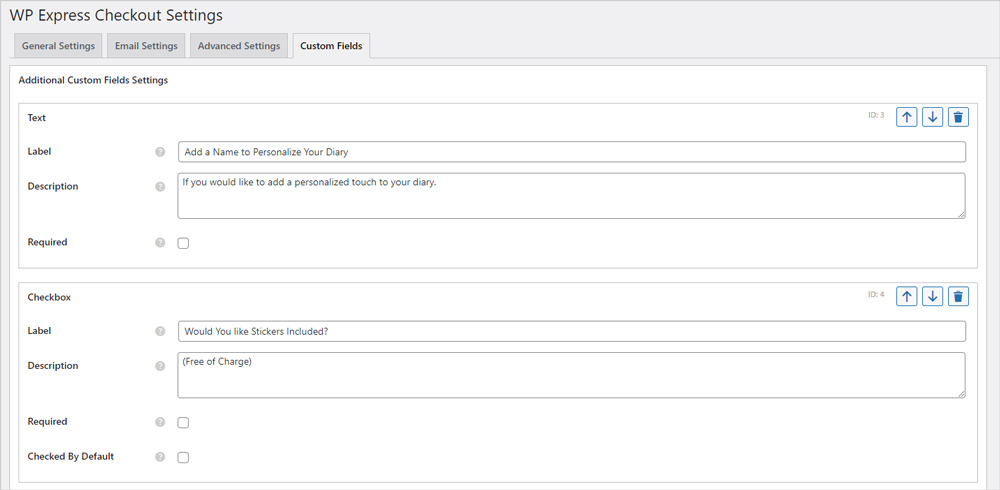
You can make any custom field ‘Required‘. This means that the customer will not be able to bypass the custom field. An answer will need to be supplied before the customer is able to make a payment.
You can use the arrows to order your custom fields, and the garbage icon to delete a custom field.
What Will My Custom Fields Look Like to a Customer?
Below you can see an example image of what each different type of custom field looks like to a customer on the front end of your website:
Step 2) Applying Custom Fields to a Product
Once you have created your custom fields, you can choose to apply all custom fields, specific custom fields, or no custom fields to the products you create/have created. This is ideal if you sell items that are vastly different, therefore needing custom fields that are specific to each product.
To apply custom fields to a product complete the following:
- Click on the ‘Products’ menu beneath ‘WP Express Checkout’ and select the product you wish to add custom fields to. Alternatively, if you are creating a new product, click the ‘Add New Product’ button.
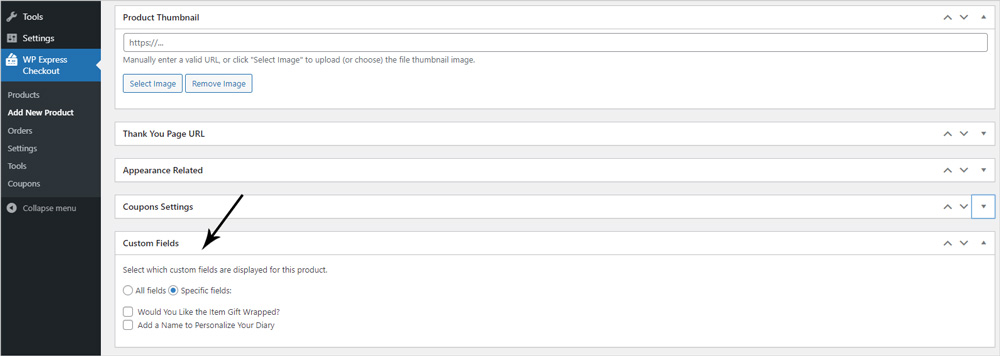
- Scroll towards the end of the product creation page and you will see a section titled ‘Custom Fields’.
- Select which custom fields you want to be displayed for the product by marking the ‘All fields’ check circle to include all the custom fields you have created, or by marking ‘Specific fields’ and then individually marking the checkboxes for the fields you wish to include. If you don’t want to include any fields for the product, click the ‘Specific fields’ check circle and then do not mark any of the individual fields.
- Once you have selected which custom fields you would like to be displayed to customers who choose to purchase the product in question, ensure you click the ‘Update‘ button.
- Head to the front end of your website and locate this product to ensure the correct custom fields are being displayed. You may also like to complete a test transaction at this stage to see how your customers will be able to answer the fields you have created.
Viewing the Custom Field Data from the Order’s Menu
Once a customer has successfully purchased a product that you have applied custom fields to, you can view the customer’s responses to the custom fields by going to the ‘Orders‘ menu.
- Click on ‘WP Express Checkout‘ and then on ‘Orders‘.
- Click on the order you wish to view the custom fields for.
- You will be able to see the custom field data under the ‘Additional Information‘ section.

Including Custom Fields in the Buyer’s or Seller’s Email
If you would like to include the custom fields in the email sent out to the ‘Buyer’ and/or the ‘Seller’, you can add a simple email tag to the body of either of the emails. Locate the ‘Buyer Email Body‘ or the ‘Seller Email Body‘ by:
- Click on the ‘Settings‘ menu found beneath ‘WP Express Checkout‘ within your WordPress dashboard.
- Click on the ‘Email Settings‘ tab.
- You will see the two email bodies.
- Beneath each of the email bodies, you will notice the email tags that can be copied and pasted.
- Add the {custom_fields} email tag to include all custom fields in the email sent to the buyer or seller. If you wish to add specific custom fields only, copy the appropriate custom field and paste it into the email body.
- Each of your custom fields has an ‘ID’. To add only a specific custom field to the email body, you can locate the ID of the custom field by viewing it from the ‘Custom Fields’ tab of the settings menu. Then simply change out the ‘0’ in the following email tag with the actual ID value of your custom field: {custom_field_value_0}.
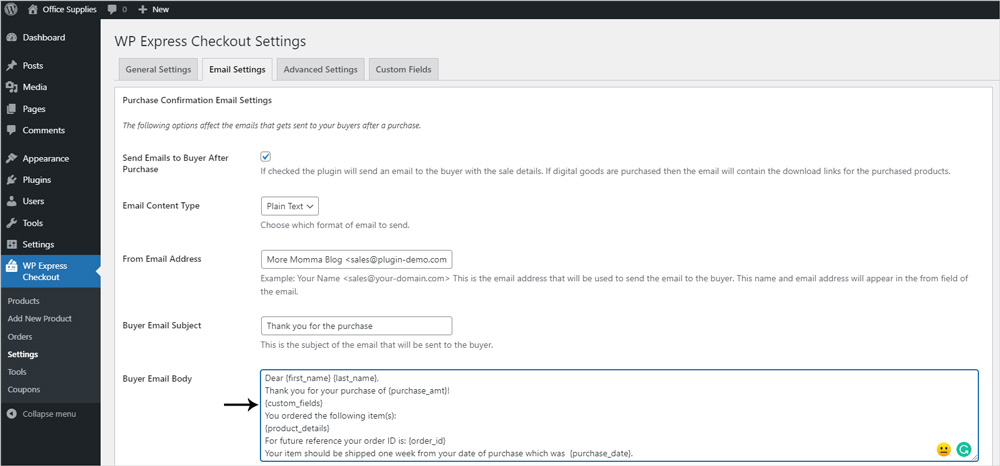
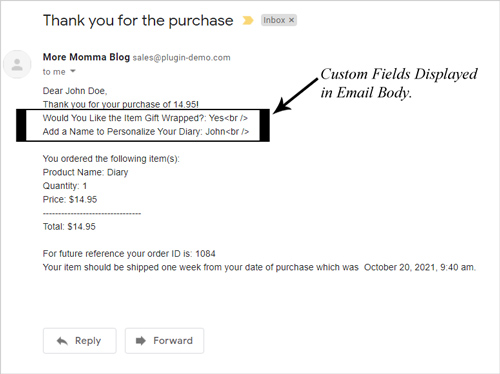
Once you have added the custom fields email merge tag into the email body, when the buyer/seller email is sent after a successful transaction, the custom fields and answers will be included. This is demonstrated below in the ‘Buyer Email’.
Including Custom Field Data on the Thank You Page
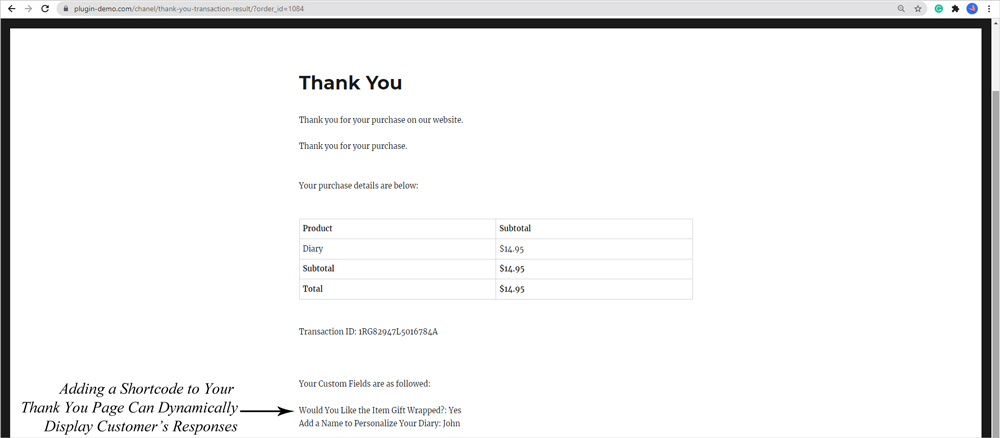
You can add a specific shortcode to the ‘Thank You‘ page that will dynamically show the data the customer has entered. You can choose to use a shortcode that will display all the custom fields that have been applied to the product or alternatively, a more specific shortcode that allows you to specify which custom field you would like to display based on the ‘custom field ID’.
- Locate the ‘Thank You‘ page from your WordPress dashboard by clicking on the ‘Pages‘ menu and then searching for ‘Thank You‘. Once you have found the WP Express Checkout ‘Thank You’ page, click on it.
- Add a shortcode block and copy and paste on the the shortcodes from below to add ‘Custom Field Data‘ to the thank you page.
- ‘Update‘ the ‘Thank You‘ page.
- Now when a customer successfully checks out with a product that has ‘Custom Fields’ their answer/s to the custom field/s will be dynamically displayed on the ‘Thank You’ page.
Displaying all the Product Custom Field Data Dynamically on the Thank You Page:
If you wish to include all the custom fields displayed to the customer on their thank you page, simply add the following shortcode to the WordPress WP Express Checkout ‘Thank You’ page:
[wpec_ty field=’custom_fields’]
Displaying Specific Product Custom Field Data Dynamically on the Thank You Page:
If you wish to display a specific custom field on the thank you page, you can use the following shortcode, simply replacing the ‘0’ with the numeric ID of the custom field. You can find the ‘ID’ of the custom field by going to the ‘WP Express Checkout’ ‘Settings’ menu and clicking on the ‘Custom Fields’ tab. In each custom field box, you will notice the ‘ID’ of that custom field.
[wpec_ty field=’custom_field_value_0′]
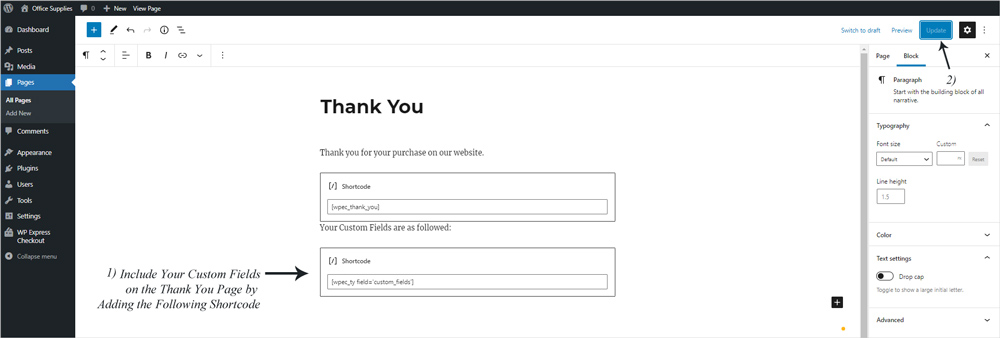
Once you add a custom field shortcode to the ‘Thank You’ page, when a customer successfully checks out with a product that has custom fields applied to it, the answers will be dynamically shown on the ‘Thank You’ page.
