The WP Express Checkout Plugin allows WordPress website owners to sell both digital and tangible (physical) items. In this tutorial, we will focus on how the WP Express Checkout can be used to efficiently process physical product sales, whereby the admin is able to collect the customer’s address details and charge a shipping amount on a per-product basis.
With the free WP Express Checkout Plugin, website owners have the ability to:
- Create a physical product ‘Buy Now’ style button.
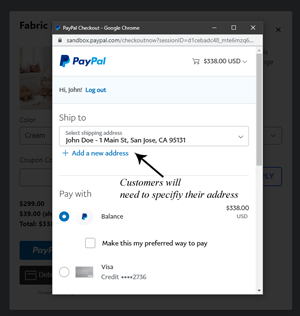
- Collect the customer’s address on checkout.
- Charge a shipping and tax percentage.
- Securely collect payments for physical items.
- Easily locate the customer’s shipping address to send physical goods after a successful transaction.
How Can I Sell a Physical Product from My WordPress Website?
Using the WP Express Checkout Plugin an easy eCommerce solution for those wishing to sell physical products from their WordPress website. This free software gives website owners the capability to sell simple physical products as well as more complex physical products by using the variation options. The plugin records the customer’s supplied address neatly so that the physical item can be shipped by the business owner once a transaction is completed successfully.
Video Tutorial: Selling Physical Products from a WordPress Website
Written Tutorial: Selling Physical Products from a WordPress Website
Step 1) Install WP Express Checkout
If you run a WordPress website where you wish to sell physical products to your customers, you can use the free WP Express Checkout to handle the online transaction. This plugin ensures the checkout process is simple and hassle-free for your customers, and their funds are transacted through one of the most trustworthy payment gateways, PayPal.
- Install and activate the WP Express Checkout on your WordPress website and ensure you complete the necessary setup (this should take no longer than 15 minutes). If you are needing extra assistance with how to set this plugin up, please see our setup documentation here.

Step 2) Create Your Physical Product Page
Now that you have installed and activated the WP Express Checkout Plugin and completed the necessary setup, you are ready to create your first product page. This is where you will stipulate the price, add the shipping cost and ensure the address of the customer who purchases this item is collected during the checkout process.

- Click on the WP Express Checkout menu, and then on ‘Add New Product’.
- From the ‘Add New Product’ page, title your product and add a description.
- In the price field, add the base price of your physical product. This will be the price before shipping or any price modified variations are added.
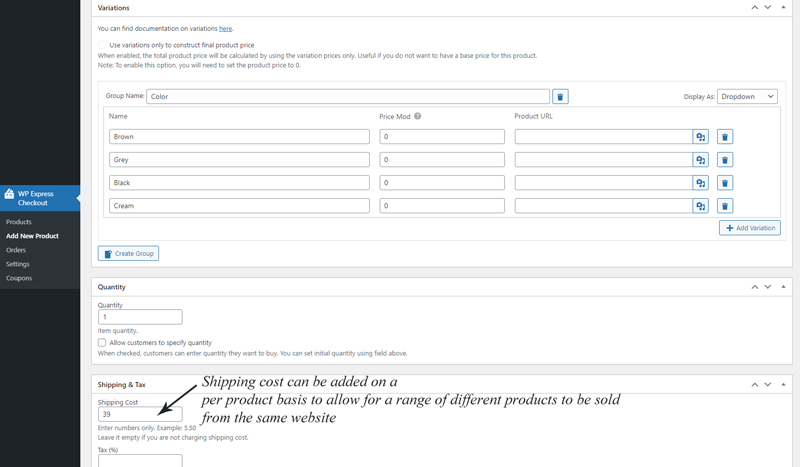
- If your product has variations such as size or color you can use the variations section to create groups of variations for example color and then use the ‘Add Variation’ button to create multiple variations such as red, pink, green, and blue. Physical products often have many variations and this section of the ‘Add New Product’ page allows you to add endless options to your product.
- You may choose to allow your customers to specify the quantity of the item, for example, they may be able to specify the quantity of how many red tee-shirts they’d like to purchase, although it makes less sense for a customer to specify a quantity for a larger item such as a couch or fridge.
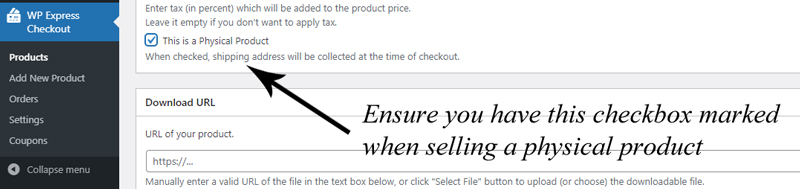
- In the shipping and tax section, add in the amount of shipping it will cost you to ship out this specific product. If you are not charging an additional amount for shipping, simply leave the field blank. Ensure you mark the ‘This is a Physical Product‘ checkbox so that the plugin knows that you wish to collect a shipping address for this product. If this checkbox is not marked, the plugin will not collect the customer’s shipping address at the time of checkout.
- Add a product thumbnail image of the product to give the customer a better look at what they will actually be receiving when purchasing this product.
- Click the ‘Publish’ button to finish the physical product creation.
Step 3) Display Your Physical Product’s Purchase Button (Buy Now Button)
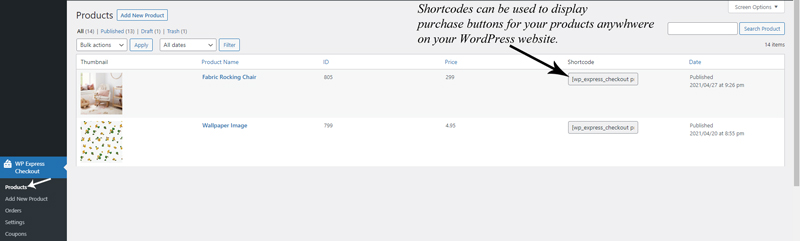
For each product, you create there is a unique shortcode that can be found within the ‘WP Express Checkout’ ‘Products’ menu. The product shortcode can be copied and pasted into the shortcode block of any WordPress post or page to display a purchase button to your potential customers.
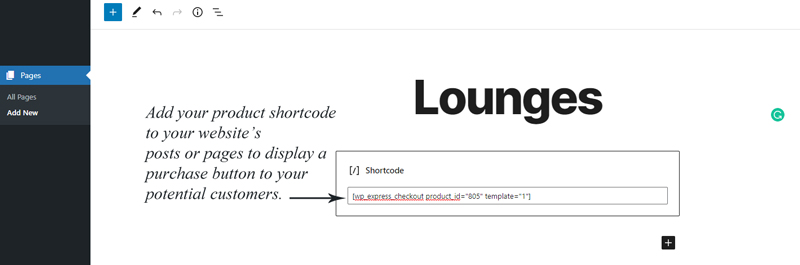
You can also paste the following shortcode into the shortcode block so that a nice product display is shown to the customers that include the product description and thumbnail image, you will just need to alter the product_id to represent the actual ID of your product.
[wp_express_checkout product_id="1234" template="1"]
Step 4) View Your Purchase Button and Wait for your First Sale
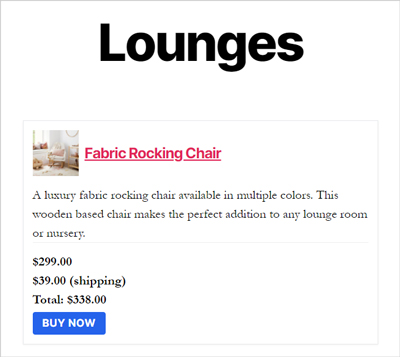
Once you add your product shortcode to a post or page on your WordPress website and you publish this to your customers, they will be able to click on the ‘Buy Now’ button to complete the transaction of your physical product. Once a customer purchases the product, during the checkout process they will need to supply their shipping details (as long as you have specified that this is a physical product in the product creation page). The customer’s shipping details can then be found from within the orders menu.
Once you receive a sale on your website for a physical item, you will need to locate the customer’s shipping details promptly so that you can fulfill the sale. To do so complete the following:
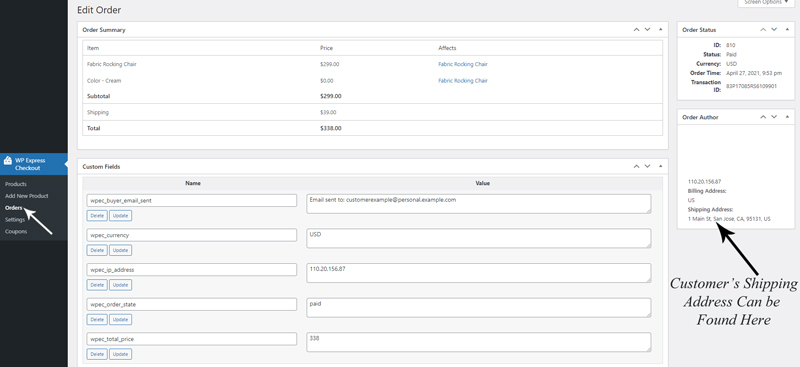
- Click on the ‘Orders’ menu under ‘WP Express Checkout’.
- Click on the ‘Edit’ button for the product transaction that you need to ship/post to the purchaser.
- You will be able to see the customer’s shipping details from this page under the ‘Order Author’ section. Simply ship your physical product to this address. You may like to send the tracking number of the parcel to the email address stated on the customer’s order page so that they can see the progress of their physical item being shipped.
How Will my Customer Purchase a Physical Product from my Website?
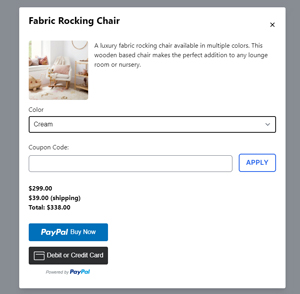
If you have used the WP Express Checkout to create product purchase buttons on your WordPress website, the checkout process will be simple, safe, and hassle-free for your customers. The checkout process will be completed within a popup window once they click the ‘Buy Now’ button meaning that the customer will never need to leave your website to purchase an item. The transaction is processed with the PayPal payment gateway meaning the purchaser’s funds are also in safe hands.
When you have set up a physical product the customer may have a shipping cost added to their original product price (which you have specified on the product creation page) and they will have to supply their shipping address. These are the only two main differences for the customer when they purchase a physical product in comparison to purchasing a digital item.