When you use the WP Express Checkout plugin to sell goods and/or services from your WordPress website, you have the ability to create payment buttons where the customer specifies the amount they wish to pay. Often these ‘Pay what you want‘ style products are used when a business owner wants to receive charitable donations. For other businesses, it makes sense to allow for a customer-specified amount, perhaps it is a digital file where they are happy to hand out the file no matter what the customer wishes to pay.
When you create a product where you intend to allow the customer to specify the amount they would like to pay, you will set a minimum amount. The minimum amount is the least that the customer can pay in order to complete a successful transaction. If you wish to give a product away for free, you can set the product price to ‘0’.
Pay what you want style products allow the customer to enter the price that they wish to pay.
Creating a ‘Customer Specified Amount’ Product
To create a product where the customer can specify the amount they would like to pay in order to receive the item or service, complete the following:
- Ensure you have the WP Express Checkout plugin installed, activated and set up on your WordPress website.
- Click on the ‘WP Express Checkout‘ menu and then on ‘Add New Product‘ to create your ‘Pay what you want style‘ payment button.
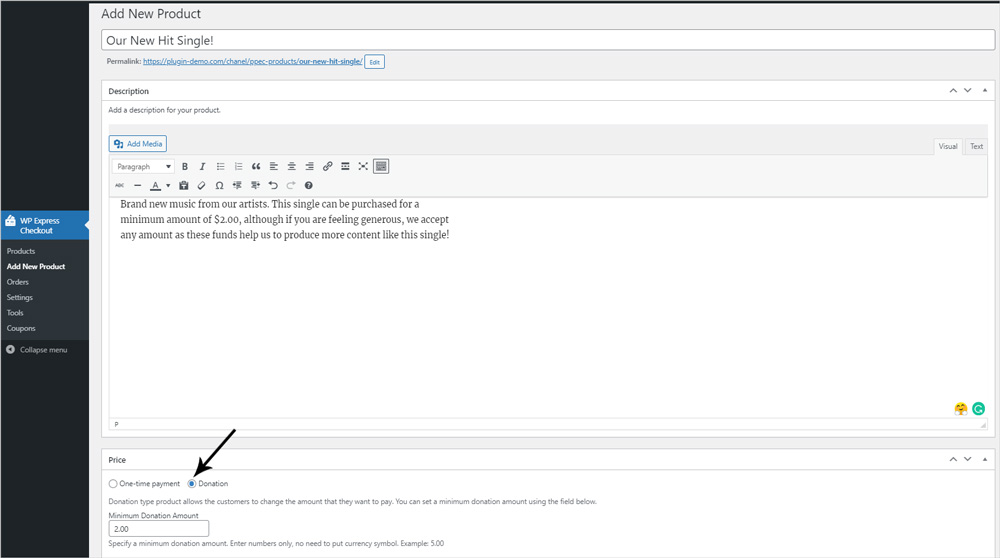
- From the ‘Add New Product‘ page, enter the title and description for the product/service.
- Within the ‘Price‘ section of the product creation page, choose the ‘Donation‘ option.
- Once the ‘Donation‘ checkbox has been selected, you will notice a ‘Minimum Donation Amount‘ field appear. Enter the minimum amount you would like the customer to pay for this item/service. Ensure you consider the PayPal fees when adding a minimum amount as an amount that is too small may end up being eaten up in fees. The amount you enter should not contain any currency symbols; currency can be changed from the ‘Settings’ menu. For example, to set a minimum amount of two dollars, you would enter 2.00
- Complete the rest of the fields within the product creation page and then finish off your product by clicking the ‘Publish‘ button.
Checking Out with a ‘Customer Specified Amount’ Product
Once you have created your product you will need to add your product shortcode to a WordPress post/page to see what the payment button looks like from the front end of your website. You might like to complete a test sandbox transaction to see how the customer can choose the price that they would like to pay for the product.
View the post/page from the front-end of your website where you have added the product shortcode. Your product button will look similar to the button below.

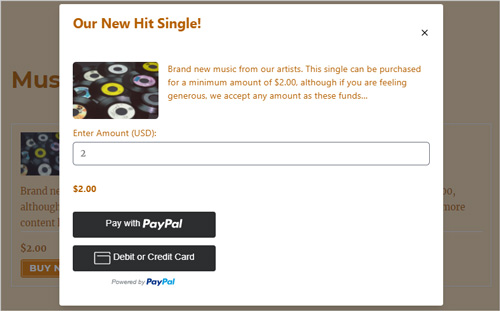
If you were a customer that landed on the page and decided to click the purchase ‘Buy Now‘ button you would see the following popup window. If you were happy with paying a minimum amount of $2.00, you could simply click the ‘Pay with PayPal‘ or ‘Debit or Credit Card‘ button.
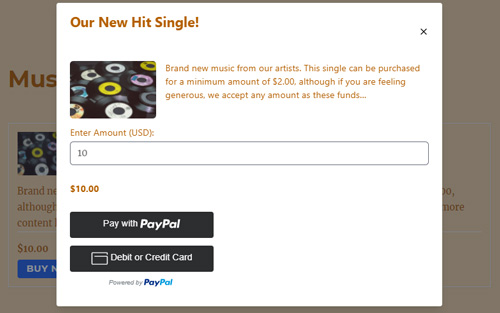
As this is a ‘Pay what you want‘ style product, the customer can alter the price and enter the amount they wish to pay/donate. In the example below the customer has decided to pay $10.00 rather than the original minimum amount of $2.00. Once the customer enters the amount they wish to pay, they can simply click one of the payment buttons to proceed with the checkout.
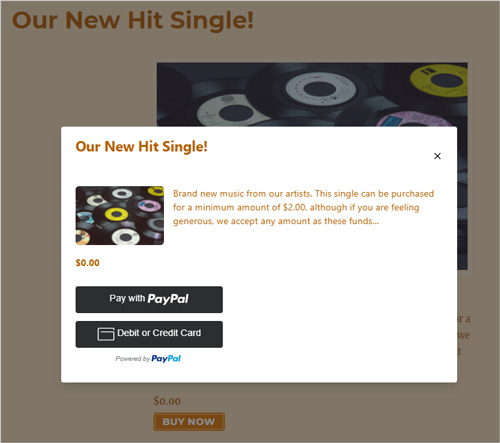
Creating a Free Product Payment Button
If you wish to create a product that is free, you can achieve this by setting the product price to ‘0‘. Simply click the ‘One-time payment’ option from the ‘Payment’ section within the product creation page and then add ‘0’ into the field. Now when a customer checks out with this product they will not need to pay.
Sometimes business owners wish to offer a free digital download link and this can be achieved using this method. If you attach the download link to the product, the customer will be able to receive the download from the thank you page for free.
If you wish to create a donation button, you can view our donation documentation here.