Using the WP Express Checkout plugin for WordPress you can configure a coupon code that customers can use to receive a discount on products/services of your choosing.

There are two types of discount codes that can be created:
- A percentage discount code:
This offers a certain percentage off the total amount of a product. For example, the code ‘TAKE50’ could represent a 50% discount that would allow a customer to purchase a product at half price. - A fixed discount code:
Is used to offer a fixed discount amount. For example, the code ‘5OFF’ could be configured to allow customers to purchase a product for $5.00 less than the original price.
From the coupon code menu of the WP Express Checkout plugin, the website admin will be able to create, manage, and monitor their product discounts. For each discount code that is created, one can configure a redemption limit, a start date, and an end date. A single code can be configured so that it can be used across the entirety of your products page or specific products only. Multiple coupons can be created to offer different discounts for the same product or a range of products.
Configuring Discount Codes for the ‘WP Express Checkout’ Plugin
Creating a coupon code using the WP Express Checkout plugin for WordPress is a simple and hassle-free process. Details of each step to creating your own discount coupon can be found below.

- Ensure you have the WP Express Checkout plugin installed and activated on your website. Once you have created products (more information on product creation can be found here), you are ready to create a coupon code that customers can use to receive a discount off the total price of a product or service that you offer.
- Within your WordPress dashboard, click on the ‘WP Express Checkout‘ menu and then on ‘Coupons‘.
- Under the title ‘Coupon Settings‘, mark the checkbox to ‘Enable Coupons‘ and then click ‘Save Settings‘.
- Click the ‘Add a Coupon‘ button to create your first coupon code.
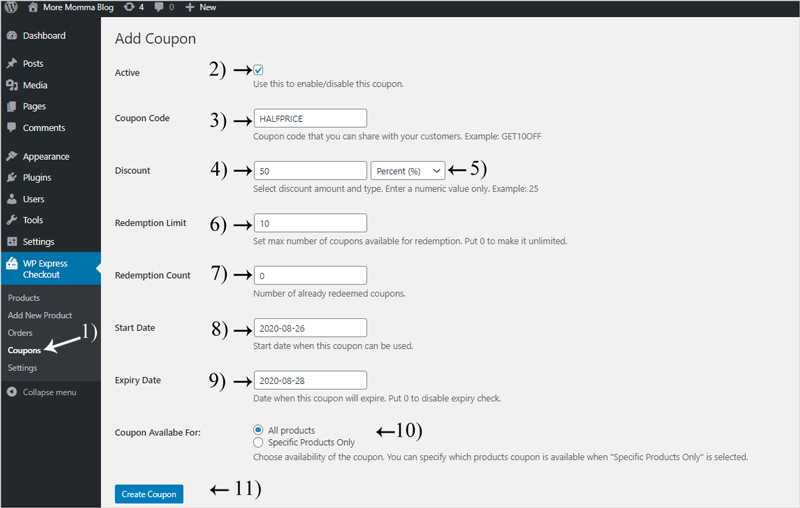
- From the ‘Add a Coupon‘ page, ensure you mark the checkbox to activate the coupon and configure the following:
Coupon Code: This will be the text that customers will need to enter in the coupon field on the front end of your website to receive the discount. Some example include: ‘TAKE5OFF’, ‘HALFPRICE’ and ’10PERCENTOFF’. The text will need to be entered exactly right by the customer to receive the discount so ensure you make it short and sweet!
Discount: In this field enter either the percentage or fixed amount you wish to be discounted and then from the drop-down menu select either ‘Percent’ or ‘Fixed Amount’.
Redemption Limit: If you wish to make the discount code exclusive you can use the redemption limit field to ensure only a set number of the code can be used on your website. For example, enter ‘100’ to allow only 100 of these discounts to be used on your website. Leave the redemption limit as ‘0’ to allow unlimited use of the code.
Redemption Count: You should not generally need to touch this field. This will represent the number of coupons that have been used. If needed you can manually alter the count.
Start Date: From the ‘date picker’ select when you wish for the coupon code to become active. This will be the first day the coupon code will be able to be used on your website.
Expiry Date: If you would like the coupon to expire, use the ‘date picker’ to choose the last day the code can be used. Leave ‘0’ in this field if you do not wish to configure an expiry for the code.
Coupon Available For: Allow the coupon to be used for ‘All Products’ or alternatively, mark ‘Specific Products Only’, and select which products the code should be allowed for. - Once you have filled in the vital information for coupon code creation, click the ‘Create Coupon‘ button. This will complete the set up for the coupon code.
- Advertise the coupon code on your website, or send the coupon code to potential customers via email, mail, or spread the word on social media.
How Can my Customers Use a Coupon Code to Receive a Discount?
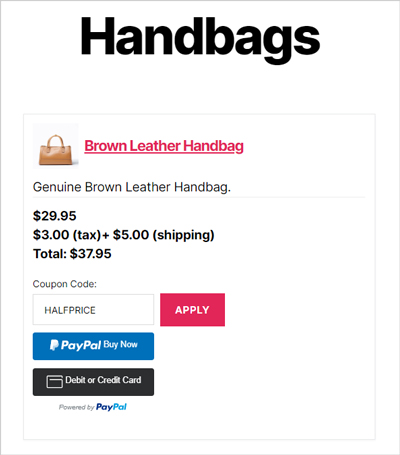
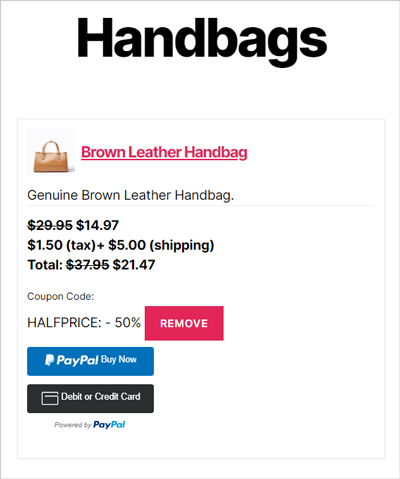
Once a customer has been given the coupon code they will be able to copy and paste (or type it) into the coupon code field of a product on your website. If the coupon code has been enabled for the product in question, the percentage or fixed discount will be applied. The customer will be able to see the final price they will pay and will be able to checkout as normal with PayPal express checkout options (PayPal Buy Now or Debit or Credit Card). The screenshot below demonstrates how the customer can enter the code, click apply, and see the final total of the product after the discount has been applied.

Managing Discount Coupons
Administrators of the website can easily view and manage their coupon codes by clicking on the ‘Coupons‘ menu found under ‘WP Express Checkout‘.

From here there is a table that outlines each coupon that has been created, and an edit button can be clicked on by hovering over the coupon in question. For each coupon you can see the following just at a glance of the table:
- The coupon code
- ID
- Active State (Enabled of Not)
- Discount Value
- Redemption Count
- Redemption Limit
- Start Date
- Expiry Date
If you wish to put a temporary stop to all discount codes, this can be achieved by deselecting the ‘Enable Coupons’ checkbox.