Once you have installed the WP Express Checkout Plugin, completed the required settings such as entering your PayPal credentials, and created your first product, you may wish to test the transaction process to ensure everything runs smoothly and to understand the process your customers will undertake to complete a successful transaction on your website.
While you can use a PayPal sandbox account to test the functionality of the WP Express Checkout Plugin, it can be easier to run through a live transaction with a small-priced product, especially if you are yet to set up a PayPal developer account.

Before advertising your products or services to potential customers, it is best practice to complete a transaction yourself to ensure the checkout process is smooth and problem-free!
Table of Contents
- Easiest Method of Testing a Transaction
- Using PayPal Sandbox to Test the WP Express Checkout Transaction Process
- Video Tutorial: Testing the Transaction Process of the WP Express Checkout Plugin
- Detailed Tutorial: Testing the Transaction Process of the WP Express Checkout Plugin
- Why Should I Complete a Test Transaction on My Website?
Easiest Method of Testing a Transaction
The easiest way to test the functionality of your payment button is to create a new payment button with an amount of $1.00 (or less). You will use this payment button just for testing purposes. This allows you to do a live transaction and test out the transaction as if you were a customer. You can issue a refund on that transaction after your testing is complete (so the payment gets reversed).
To make the purchase, you can either use your credit card or ask a family member or friend to use their PayPal account to purchase the item on your site.
Performing live testing in this manner will help confirm that your site is ready to accept real payments from customers.
Using PayPal Sandbox to Test the WP Express Checkout Transaction Process
While we won’t go into details about using sandbox in this tutorial, for those familiar with PayPal sandbox, you can use it to complete a test transaction on your website when you create products with the WP Express Checkout Plugin. You will need to locate your PayPal sandbox email address and password and then you simply run the plugin in test mode and paste your credentials in the PayPal checkout window in the corresponding fields. PayPal sandbox is better suited for advanced users since it requires you to setup a PayPal developer account correctly. You can read more about using PayPal Sandbox here.
Note: PayPal sandbox email addresses are not real email inboxes. Real emails sent from your server cannot reach the made up sandbox PayPal inbox. So don’t expect to receive a sale notification to your made up sandbox email address.
If you have a PayPal developer account, you can read this general documentation on using PayPal Sandbox Testing and apply the same method when completing checkout with a product/service created with the WP Express Checkout Plugin.
Video Tutorial: Testing the Transaction Process of the WP Express Checkout Plugin
Detailed Tutorial: Testing the Transaction Process of the WP Express Checkout Plugin
If you wish to test the transaction process as if you were a customer checking out with a product or service you are selling through the WP Express Checkout Plugin on your WordPress website, complete the following steps.
Step 1) Enable the Debug Logging Feature to Track the Transaction Steps
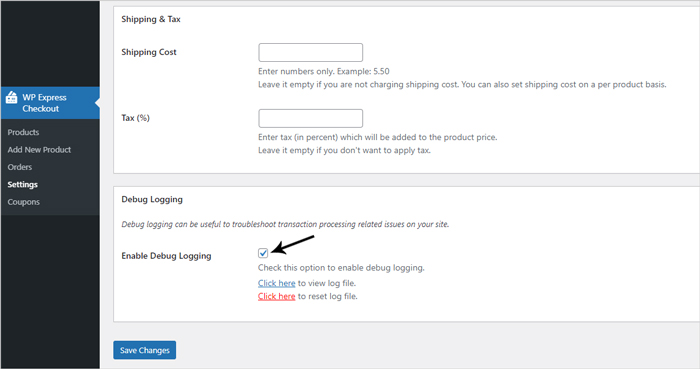
Before you complete your transaction, it is a good idea to enable the debug logging feature so that if something does not go as expected when you complete the checkout process, you can see what may have gone wrong. The debug logging feature writes to the log file the various tasks the plugin performs after a transaction. It is an easy way to identify if anything is failing after the payment. For example, if the purchase confirmation email fails to send to the buyer, the debug logging feature will outline this.

It is a good idea to reset your log file before you begin a test transaction so that you know that the information within the log file relates to the test you are completing.
Step 2) Complete a Transaction of a Product You Have Created with the WP Express Checkout Plugin
It is often best practice to run through a live transaction of the product/service you are selling on your website. We recommend briefly altering the price of the product to $1.00 to complete the transaction. You can simply do this by clicking on your product and editing the price and then clicking update. Once you have altered the price of the product, you will be able to complete the live transaction of the product.
To complete the transaction using a PayPal account, you will need to use a different PayPal account for the buyer (you won’t be able to use the same PayPal account that you are using as the merchant/seller account). So if you have a family member or a friend who has a PayPal account, you will be able to use that to complete the checkout. Alternatively, you can use the debit/credit card option and complete the transaction using your own credit/bank card.
Running through a live transaction allows you to see the exact checkout process that your customers will need to complete to successfully purchase a product on your website. This will allow you to ensure that all the functions are working correctly.

- Change the price of the product to a small testing amount, for example $1.00. This ensures you are able to complete a live transaction without it breaking the bank. You can briefly alter the price of your product by clicking on the ‘Products‘ menu and editing the product in question. Then locate the ‘Price‘ field and make the price a small amount. Click the ‘Update‘ button.
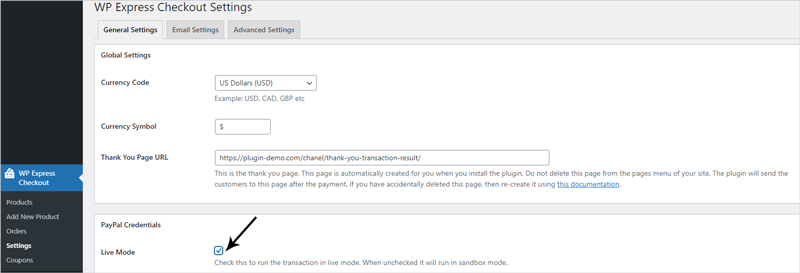
- Ensure you have live mode enabled. You can enable live mode by clicking on WP Express Checkout -> Settings and marking the checkbox next to Live Mode. You will also need to ensure that you have your Live Client ID and Live Secret Key pasted into the correct fields, which should have been completed by following this documentation. This will allow you to run a live transaction on your website.
- Now you will be able to complete the transaction with either a PayPal account that differs to the merchant account you have set up the WP Express Checkout with, or a credit or debit card.
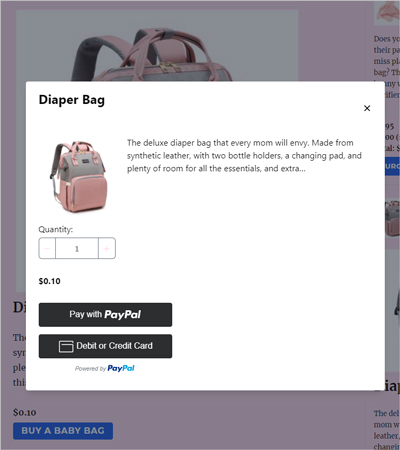
- Simply locate the page where you have added your product shortcode and click on the purchase button (Buy Now). You will see the popup window where you will be able to checkout with a PayPal account or a credit or debit card. Complete the transaction.
- After your successful product purchase (test run through) you should be directed to the thank you page. If you have set up the emails correctly, you should also receive a purchaser confirmation email.
- If you find any of the transaction steps appear to be failing, take a look at the debug log to determine what might be going wrong on your specific WordPress website.
- Now that you have completed a live transaction on your website, don’t forget to return your product to its original price.

Why Should I Complete a Test Transaction on My Website?
Completing a test transaction prior to directing a potential customer to your sales page is important in ensuring the checkout process is free from any problems. Completing a test transaction allows you as an admin to ensure:
- Funds are being sent to your merchant account successfully
- The purchaser is directed to the thank you page after a successful purchase
- Customers receive their sales notification email
- The checkout process works on your website across a number of devices (mobile phone and laptop)
- The transaction process runs smoothly and is hassle-free
- Products have been set up with the correct currency
- Products that contains digital files are accessible after a successful transaction