The Simple WordPress Membership Plugin can be integrated with the WP Express Checkout Plugin to accept membership payments. This can be helpful if you wish to sell memberships from your WordPress website.
The Simple Membership and the Express Checkout plugins are well-documented plugins meaning it is easy for anyone to set up a simple membership on their website where the payments are handled in a neat and secure popup window.

When you use the WP Express Checkout Plugin alongside the Simple WordPress Membership Plugin, your customers will be able to use your product’s Buy Now button to checkout in the PayPal popup window. After a successful transaction is complete, the customer will be emailed the registration link to fill in their membership details. If you wish to offer membership on your website where you are using the WP Express Checkout Plugin (or you intend to use it), follow the steps below to complete the Simple WordPress Membership Plugin integration.
Video Tutorial: Integrating Simple Membership Plugin with the WP Express Checkout Plugin
Written Tutorial: Integrating WP Express Checkout Plugin with the Simple WordPress Membership Plugin
Step 1) Installing and Activating the Two WordPress Plugins

First things first, you will need to install and activate both the free WP Express Checkout Plugin and the free Simple WordPress Membership Plugin. You can install these both directly from WordPress.org through your WordPress dashboard by clicking on the ‘Plugins‘ menu and then on ‘Add New‘.
Once you have installed and activated both of the plugins, you will see two new menus in your WordPress dashboard titled: ‘WP Express Checkout‘ and ‘WP Membership‘. These menus are where you will set up your memberships, membership style products, and also where you will view your active memberships and payments.

Step 2) Creating Your Membership Level
Before you start this step, ensure you have the basic setup and configuration done for the Simple Membership Plugin. You can follow this documentation to setup the plugin.
You will need to set up your membership level so you can then attach it to the product that you create with the WP Express Checkout Plugin.
- Click on the WP Membership > Membership Levels menu.
- Then click on the Add New button to create your membership level. Hit the Add New Membership Level once you have filled in the required fields. You can read more about adding your membership level here.
Now that you have created your membership level, you will need to grant access to pages that those that join this membership level should be able to view. You can read how to setup content protection here.
Once you have set up your membership level you are ready to proceed to the next step.
Step 3) Adding Your Membership Level to Your Product
Before you commence this step, ensure that you have completed the basic setup of the WP Express Checkout Plugin. You can follow this documentation to complete the basic setup of the plugin.
- Click on the WP Express Checkout > Add New Product menu.
- From here, create your product by giving it a title, description and price. Add a product thumbnail and fill in the other fields as desired for the product creation.
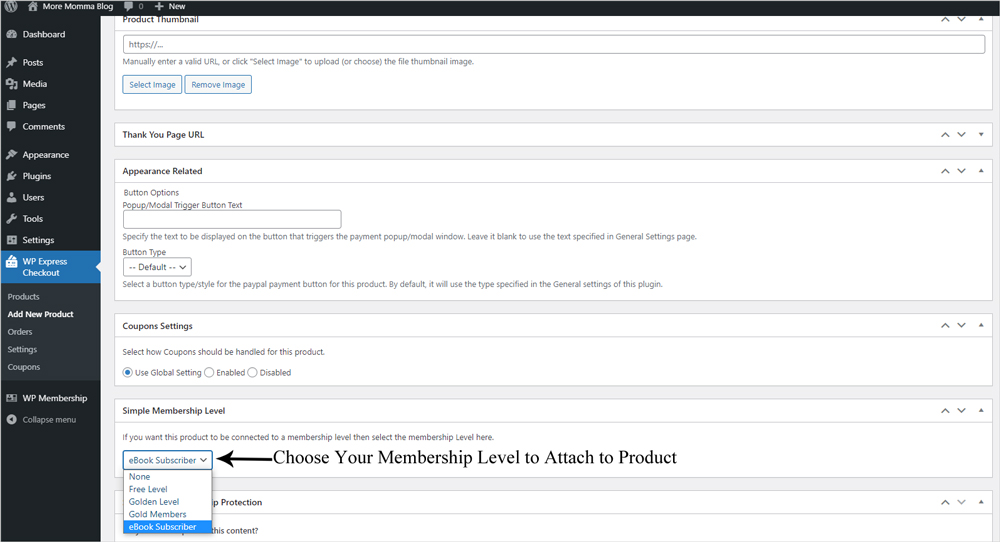
- You will see a section titled Simple Membership Level in the product creation page towards the bottom. From this section, select the membership level from the drop-down menu that you wish to attach to this product. This means anyone who purchases this product will be put into that membership level.
- Publish out your product.

Step 4) Add Your Product Button to Your WordPress Website
Now that we have created our membership level and attached it to a product, we are ready to add our product shortcode to our landing page. Once we do this, customers can click on the payment button, purchase the product, and be added as a member.
- Click on the WP Express Checkout > Products menu.
- Copy the shortcode of the product you just created.
- Add the shortcode to a page or post on your WordPress website using the shortcode block option.
- Publish out the page.
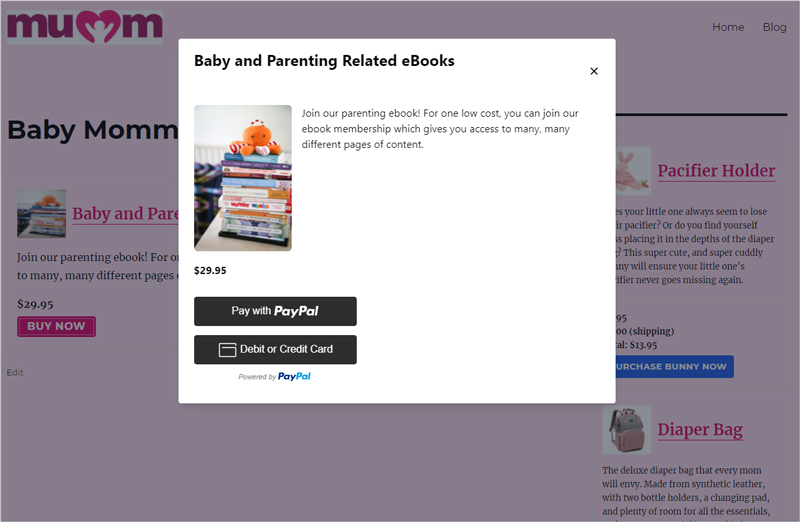
- Once you view the page from the front end of your website you will see your product’s purchase button. Adding the parameter template=”1″ to your shortcode will add your product details alongside the purchase button.

Step 5) Complete a Test Transaction on Your Website
Now that you have successfully added your payment button to your WordPress website, completing a test transactions is encouraged.
- As a customer, click on the product purchase button from the front end of your website.
- You will see the popup window appear where you will need to click to checkout with PayPal.
- Enter your PayPal information and proceed to complete a successful transaction.
- You should receive an email to the address you used to pay. This email will include your membership registration link. Click on this to complete the member registration on your website.
When Testing the Functionality of the Buy Now Button Ensure:
- You are able to complete the payment with the PayPal popup
- You do not see any errors
- The registration email is sent through to the purchaser
- You are able to sign up using the registration form sent to the email
- You are able to view hidden content intended for the level you have paid for

Step 6) Edit the Thank You Page to Inform Members of Process (Optional)
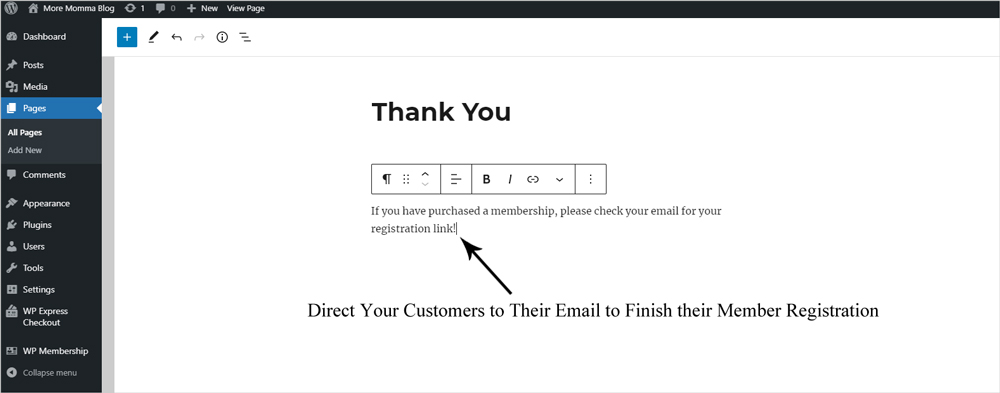
You may like to add a sentence or two to your thank you page that is presented after a successful purchase to let your purchasers know to check their email for the registration link to complete their membership. The thank-you page that a customer is directed to is a simple WordPress page, so you can edit this page by searching ‘Thank You‘ in your page’s menu. Beneath the shortcode on the thank-you page, simply add a paragraph block and enter the information you would like your customer to see after their successful membership purchase. Ensure you click the ‘Update’ button to make sure it is saved.

What Happens After a Successful Payment of a Membership Style Product?
Once customers successfully purchase a product that you have created with the WP Express Checkout Plugin that has a Simple WordPress Membership level attached to it, they will be directed to a thank you page. If they are a new member they will receive an email that contains a special link which enables the users to complete their registration for the membership. If the customer who purchases the product is already a member of your website (and is logged-into the site), then the membership level associated with the product they just purchased will be applied to their profile. You can learn how the membership registration or sign-up process works here.
Read further information and documentation about the Simple Membership plugin here.