You can integrate MailChimp with the WP Express Checkout Plugin using the WP Express Checkout MailChimp Integration Addon.
When you use the WP Express Checkout MailChimp Integration Addon you have the ability to send the email of customers who successfully checkout with a product on your website to a specific MailChimp list. MailChimp Lists are specified on a per-product basis allowing admin the ability to easily compile customer’s email addresses for future email marketing purposes.
Installing the WPEC MailChimp Integration Addon
Once you have purchased this addon you will be able to install it directly onto your WordPress website. If you are yet to purchase this addon and wish to do so, please scroll to the bottom of this page.
To install and activate the WP Express Checkout MailChimp Integration Addon, complete the following steps:
- Click on the Add New menu under the plugins interface.
- Click on the Upload Plugin button and select the addon’s zip file.
- Hit the Install Now button and then activate the addon.
- You are now ready to set up the MailChimp Integration Addon.
Setting Up the WPEC MailChimp Integration Addon
Once you have purchased the WPEC MailChimp Integration Addon and you have installed and activated it on your WordPress website, you will be able to complete the following configuration steps:
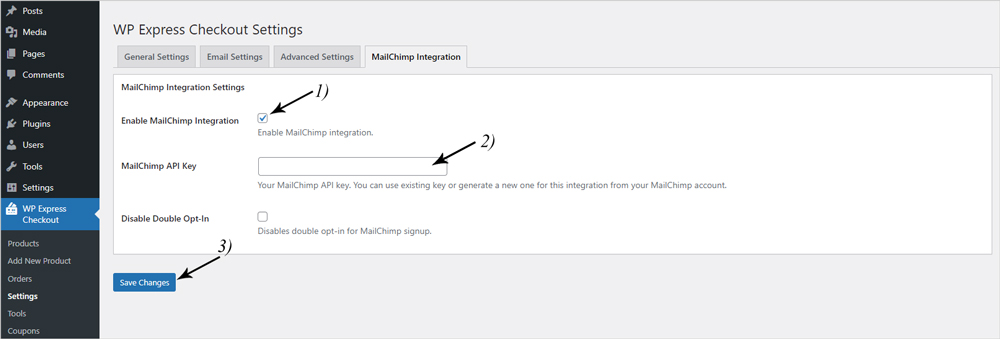
- Click on the ‘WP Express Checkout‘ menu and then on ‘Settings‘. From the tab options, select the new tab titled ‘MailChimp Integration‘.
- Mark the checkbox to enable the MailChimp integration.
- Next you will need to enter your MailChimp API Key in the appropriate field. Your MailChimp API Key can be found within the settings menu of your MailChimp account. Ensure you enter your API key accurately in order to successfully receive customer’s email addresses.
- Click the ‘Save Changes‘ button. You have now completed the simple setup of the WPEC MailChimp Integration Addon.
When a new customer is added to your MailChimp list they will receive an email from MailChimp telling them to confirm that they have signed up. You can disable this email by marking the ‘Disable Double Opt-in‘ option within the MailChimp Integration Settings menu. If you leave the checkbox unmarked, the customer will receive the email to confirm their MailChimp signup.

How Do I Use the WPEC MailChimp Integration Addon to Collect and Store Customer Email Addresses?
Once you have the WP Express Checkout MailChimp Integration Addon you can easily collect and store the email addresses of your customers in your MailChimp account. For each product you create using the WP Express Checkout plugin, you will have the option to specify a MailChimp List Name where the email addresses of those who purchase that product will be sent to. This allows you to send the email addresses of customers who purchase different products to different MailChimp Lists which is useful for those who wish to email market specifically based on a customer’s previous purchase.
To collect your customer’s email addresses to be stored within your MailChimp account, you will need to enter your MailChimp List Name on a per-product basis. Follow the steps below to do so:
- From your WordPress dashboard, click on ‘WP Express Checkout‘ and then on the ‘Products‘ menu.
- Complete the product creation as normal. Once you have completed your product creation, scroll to the ‘MailChimp Integration‘ section.
- Within the ‘MailChimp Audience Name‘ field, enter in the name of the MailChimp Audience also known as the MailChimp List that you would like the email addresses of customers who purchase this product to be sent. If you do not wish for the email addresses of customers who purchase this product to be added to any of your MailChimp lists/audiences, simply leave the field blank.
- Optionally, you can also enter in your MailChimp Audience Group Name/s in the appropriate field. Also known as interest groups, if you do choose to also enter in your MailChimp Audience Group Names, ensure you separate each with a comma.
- Once you have entered your MailChimp Audience information, you will need to click the ‘Update‘ button.
- Now once a customer successfully completes a transaction of this product/service, their email address will be sent directly to your MailChimp Audience (MailChimp List). You can then market to this email audience from your MailChimp account.

Which Email Address Will Be Sent to MailChimp?
When you use the WP Express Checkout MailChimp Addon, the email address your customer enters when completing their transaction will be sent to your specified MailChimp List. This is the email address the customer enters in the WP Express Checkout popup window.
Common Issues and Troubleshooting
When you use the WP Express Checkout Plugin with the MailChimp Addon, and you complete the set up process correctly, your customer’s emails should be added to your specified list after a successful payment. If you are not noticing your customer’s email addresses being added to your desired MailChimp list, this means something is going wrong somewhere along the way. The best way to troubleshoot is to use the debug logging feature.
If you are trying to pinpoint what is going wrong on your site, you can read how to use the WP Express Checkout Debug feature here.
