If you have ran into an issue while using the WP Express Checkout Plugin on your WordPress website, perhaps your customers are not receiving their sales notification after a successful purchase, the debug log is a great troubleshooting resource.

What is a Debug Log and What Does it Do?
Many plugins, especially those that process payments will have a debug log. This feature logs steps of the payment process and those steps that were not able to be completed are marked as a ‘Failure’. This gives admin an insight into which step of the payment process needs attention in order to work correctly.
Generally, a failure in the payment process is caused by an incomplete or incorrect set up of the plugin. Please browse through the documentation page to ensure you have completed all setup required for the WP Express Checkout Plugin.
How Can I Enable the Debug Log?
By default, the debug log is not enabled. If you are testing the WP Express Checkout payment process it is a good idea to enable the debug log first. This way, if you find that there is a problem with one step in the payment process or the email is not being sent to either the merchant or the customer, you can diagnose the issue quickly and easily.
To enable the debug log for the WP Express Checkout Plugin complete the following:
- Click on the ‘WP Express Checkout‘ ‘Settings‘ menu.
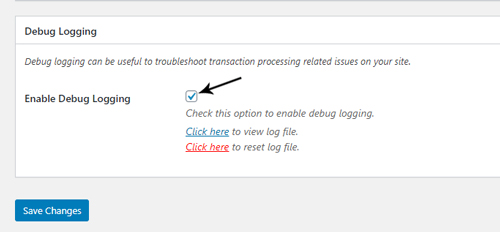
- Towards the bottom of the ‘General Settings‘ tab, you will see a section titled ‘Debug Logging‘.
- Mark the ‘Checkbox‘ to enable the debug log.
- Click the ‘Save Changes‘ button.

Viewing the Debug Log to Solve an Issue
Once you have enabled the debug log and completed a test or live transaction on your website using the WP Express Checkout Plugin, you can click on the log file to see the details and potentially outline a step of the process that is failing.
- Ensure the debug log is enabled (see instructions above to enable-debug)
- Complete a test transaction on your website.
- If you see any errors or an email you expect to be sent is not being received, you may wish to view the debug log.
- Click on the ‘WP Express Checkout‘ ‘Settings‘ menu and then scroll to the ‘Debug Logging‘ section.
- Click to ‘View Log File‘.
- The Log File will be displayed which you can examine for potential failures. Each step that has been completed correctly will have the word: [SUCCESS].
- Any step that is failing will be outlined with the word [FAILURE]. Try to correct failures by reading why the action is failing. If you are unable to correct the issue yourself, contact the WP Express Checkout Support Team.
Example Debug Log of Successful Transaction:
2019-12-13 01:02:30: [SUCCESS] Received IPN. Processing payment ...
2019-12-13 01:02:30: [SUCCESS] Sending buyer notification email.
2019-12-13 01:02:39: [SUCCESS] Buyer email notification sent to: [email protected]. From email address value used: More Momma Blog <[email protected]>
2019-12-13 01:02:39: [SUCCESS] Sending seller notification email.
2019-12-13 01:02:48: [SUCCESS] Seller email notification sent to: [email protected]
2019-12-13 01:02:48: [SUCCESS] Payment processing completed
2019-12-13 01:02:30: [SUCCESS] Received IPN. Processing payment ...
2019-12-13 01:02:30: [SUCCESS] Sending buyer notification email.
2019-12-13 01:02:39: [SUCCESS] Buyer email notification sent to: [email protected]. From email address value used: More Momma Blog <[email protected]>
2019-12-13 01:02:39: [SUCCESS] Sending seller notification email.
2019-12-13 01:02:48: [SUCCESS] Seller email notification sent to: [email protected]
2019-12-13 01:02:48: [SUCCESS] Payment processing completed
Once you have examined the debug log and resolved the issue, ensure you clear and disable the log.