When you install and activate the WP Express Checkout Plugin on your WordPress website, a Thank You page is created automatically and can be found under the Pages menu in your dashboard.
Table of Contents
- What is a Thank You Page
- Example Thank You Page Output
- Video Tutorial
- Customizing the WP Express Checkout Thank You Page
- Individual Field Shortcodes for the ‘Thank You’ Page
- Example of Shortcodes on a Page
- Filter Hooks
What is a Thank You Page
The Thank You page is just like any other WordPress page, and by default, the customers are directed to this page after a successful transaction.
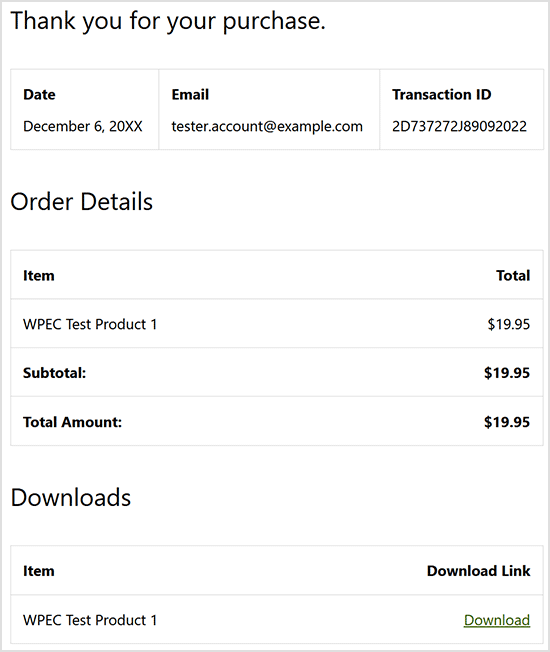
It displays the transaction information to your customers such as the item/s they have purchased, and the total amount that they paid. If you are selling a digital product, then it will also give them a download link to download the item.
You can edit the ‘Thank You’ page and customize it to some degree, although it is important to understand the following:
- The shortcode that appears on the ‘Thank You’ page dynamically shows information to the customers after their successful purchase. You can delete this to replace it with other shortcodes that show specific information relating to the purchase.
- Do not alter the URL of the ‘Thank You’ page. If you do delete the page or change the URL accidentally, make sure to re-create it using this instructions.
Example Thank You Page Output
The screenshot below illustrates an example of the Thank You page output of this plugin:
Video Tutorial
Customizing the WP Express Checkout Thank You Page
1) Locating the WP Express Checkout Thank You Page
You can locate the Thank You page from the admin dashboard of your site:
- Click on the ‘Pages‘ menu in your WordPress dashboard.
- From there, type ‘thank you‘ into the ‘Search Pages‘ field and click enter. You should see the Thank You page appear.
- Click the ‘edit‘ button for the ‘Thank You‘ page.
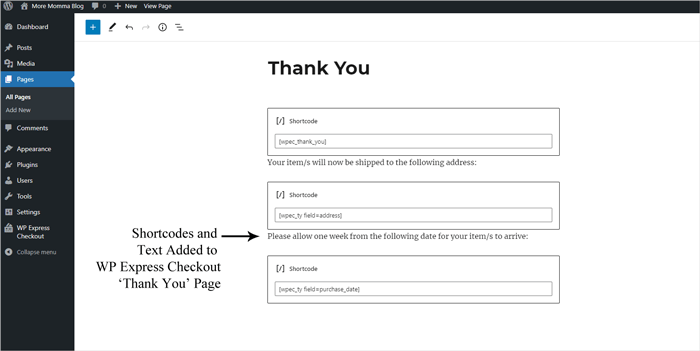
2) Completing Customization of the Thank You Page
You can add text, images, etc to your thank you page. You will notice the following shortcode has already been added to the thank you page:
[wpec_thank_you]
The above shortcode shows a range of transaction related information including the total price and items that have been purchased. You can delete this shortcode if you want to replace it with shortcodes from the following section. Alternatively, you can leave the existing shortcode and add additional shortcodes to this page to suit your thank you page.
Individual Field Shortcodes for the ‘Thank You’ Page
You can use the following shortcodes on the Thank You page to customize it further.
You may wish to copy and paste any of the following shortcodes to your thank you page to dynamically show additional transaction related information to your customers. Any of the shortcodes below can be added to your ‘Thank You’ page only:
Customer’s First Name: [wpec_ty field=first_name]
Customer’s Last Name: [wpec_ty field=last_name]
Product Details: [wpec_ty field=product_details]
Product ID: [wpec_ty field=product_id]
Product Name: [wpec_ty field=product_name]
Customer’s Email: [wpec_ty field=payer_email]
Transaction ID: [wpec_ty field=transaction_id]
Total Purchase Amount: [wpec_ty field=purchase_amt]
Date of Purchase: [wpec_ty field=purchase_date]
Currency Code Used: [wpec_ty field=currency_code]
Coupon Code Applied: [wpec_ty field=coupon_code]
Customer’s Address: [wpec_ty field=address]
Order ID: [wpec_ty field=order_id]
Download Link for Digital Items: [wpec_ty field=download_link]
Download Link (Custom Anchor Text)
Use the “anchor_text” parameter in the shortcode to provide a custom anchor text for the download link:
[wpec_ty field=download_link anchor_text="Custom Anchor for Download Link"]
Download Link Without Any Anchor Text (Just the URL)
Use an empty “anchor_text” parameter in the shortcode to remove the anchor text from the download link (it will use the download URL as the anchor):
[wpec_ty field=download_link anchor_text="Custom Anchor for Download Link"]
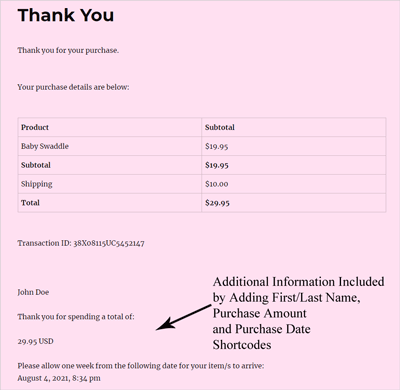
Example of Shortcodes on a Page
Once you have added the shortcode/s that you want to your ‘Thank You’ page, click the Update button. Completing a test transaction allows you to see what the ‘Thank You’ page looks like to your customers.
Filter Hooks
This documentation page has details on the available filter hooks for the Thank you page.